The Complete Guide to Repotting & Pruning Indoor Plants: Expert Techniques for Plant Health

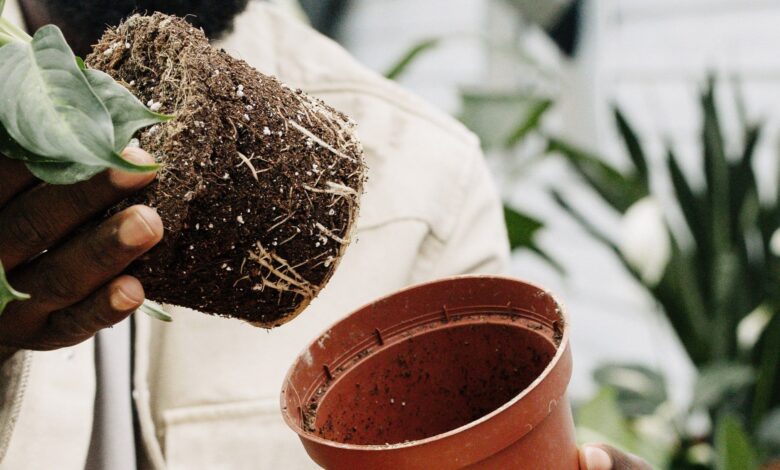
I avoided repotting my monstera for two years because I was terrified of damaging it. The plant became root-bound, growth slowed to nothing, and leaves yellowed. When I finally worked up the courage to repot, the transformation was incredible. Within weeks, new leaves unfurled and the plant looked vibrant again.
Repotting and pruning are essential houseplant maintenance skills that seem intimidating but are actually straightforward once you understand the basics. These techniques keep plants healthy, control size, and encourage better growth. Most plants benefit from both practices at some point.
In this guide, I’m covering everything you need to know about repotting and pruning indoor plants. You’ll learn when plants need these interventions, how to do them correctly, and what mistakes to avoid. These skills will keep your plant collection thriving for years.


Understanding When Plants Need Repotting
Knowing when to repot prevents both unnecessary stress and waiting too long. Plants give clear signals when they’ve outgrown their current containers.
Signs Your Plant Needs Repotting
Roots growing from drainage holes are the most obvious indicator. When roots have nowhere else to grow, they emerge seeking more space.
Water running straight through without absorbing suggests the pot is mostly roots with little soil left. The root mass can’t hold water properly anymore.
Extremely slow growth despite good care often means the plant is root-bound. It’s spending all its energy maintaining existing roots rather than producing new growth.
Top-heavy plants that tip over easily have outgrown their pots. The root system can’t anchor the plant’s size anymore.
Soil that dries out within a day or two of watering indicates roots have filled all available space. There’s not enough soil to hold adequate moisture.
I learned to recognize these signs after nearly losing several plants to being root-bound. Now I check for these indicators regularly rather than waiting for obvious problems.
When Repotting Isn’t Necessary
Not all plants need frequent repotting. Some actually bloom better when slightly pot-bound.
African violets flower more prolifically in smaller pots. They prefer being snug in their containers.
Succulents and cacti grow slowly and can stay in the same pot for years. Only repot when extremely root-bound or soil has broken down.
Peace lilies tolerate being root-bound reasonably well. They show clear wilting signals when thirsty regardless of pot size.
Newly purchased plants don’t need immediate repotting. Let them acclimate to your home for several weeks before considering a pot change.
Best Timing for Repotting
Spring is ideal for repotting most houseplants. New growth is beginning and plants recover quickly from root disturbance.
Early summer works well too, giving plants the entire growing season to establish in new pots.
Avoid repotting during fall and winter when most plants are dormant or semi-dormant. They won’t actively grow new roots to fill the fresh soil.
Never repot a stressed or sick plant unless root rot is the problem. Address other issues first, then repot during recovery.
I mark my calendar in late winter to check which plants might need repotting come spring. This prevents forgetting and helps me gather supplies in advance.
How to Repot Houseplants Step-by-Step
Repotting doesn’t have to be scary. Following a clear process makes it straightforward and minimizes plant stress.
Gathering Your Supplies
Collect everything before starting. Having supplies ready prevents leaving plants sitting with exposed roots.
Essential Items:
- New pot (1-2 inches larger in diameter)
- Fresh potting mix appropriate for plant type
- Newspaper or tarp for workspace
- Watering can
- Pruning shears or scissors
Optional But Helpful:
- Root pruning knife for severely root-bound plants
- Chopstick or pencil for settling soil
- Gloves if handling irritating plants
Choosing the Right Pot Size
Bigger isn’t always better when selecting new pots. Oversized containers hold too much moisture and slow growth.
Go up just 1-2 inches in diameter for most plants. This gives roots room to grow without overwhelming the plant with excess soil.
For very large plants, even 2 inches makes a significant volume increase. Sometimes 1 inch is sufficient.
The new pot must have drainage holes. Non-draining containers create waterlogged conditions that kill roots quickly.
I made the mistake early on of jumping plants into much larger pots thinking it would save repotting frequency. Instead, I ended up with overwatered, struggling plants in overly large containers.
The Repotting Process
Water your plant 24 hours before repotting. Moist soil holds together better than dry or soggy soil.
Gently remove the plant from its current pot. Squeeze flexible pots or run a knife around the edge of rigid pots to loosen. Turn the pot sideways and ease the plant out.
Examine the root ball. Healthy roots are white or light-colored and firm. Brown, mushy roots indicate rot and need removal.
Gently tease out circling roots around the edge of the root ball. This encourages them to grow outward into new soil rather than continuing to circle.
Add fresh potting mix to the bottom of the new pot. Position the plant at the same depth it was previously growing.
Fill around the root ball with new potting mix. Tap the pot on your work surface to settle soil naturally. Don’t pack it down hard.
Water thoroughly until it drains from the bottom. This settles the soil and eliminates air pockets around roots.
Post-Repotting Care
Place the plant in its regular location but avoid direct sun for a few days. Bright indirect light gives it time to recover.
Hold off on fertilizing for 4-6 weeks. Fresh potting mix contains nutrients, and newly disturbed roots shouldn’t be pushed to grow aggressively.
Water when the top inch of soil dries. Don’t keep it constantly wet assuming the plant needs extra moisture during recovery.
Some leaf drop or temporary wilting is normal after repotting. Most plants recover within a week or two.
Understanding Plant Pruning
Pruning removes plant parts to improve health, appearance, or size. Different types of pruning serve different purposes.
Why Prune Indoor Plants
Pruning encourages bushier growth by stimulating dormant growth nodes below cuts. This creates fuller, more attractive plants.
Removing dead or dying leaves prevents pest problems and improves appearance. Dead material attracts insects and can harbor disease.
Size control keeps plants manageable for their space. Some houseplants grow large without regular trimming.
Improving air circulation through the plant’s interior reduces disease risk. Dense, crowded growth traps moisture and promotes fungal issues.
Propagation starts with pruning. Stem cuttings from pruned growth can create new plants.
I initially felt guilty cutting healthy growth from my plants. Now I understand pruning actually improves plant health and creates opportunities for propagation.
Types of Pruning Cuts
Pinching removes just the growing tip of a stem using your fingers or scissors. This encourages branching without making dramatic changes.
Heading cuts remove a longer section of stem back to a node. This promotes fuller growth from the remaining nodes.
Thinning cuts remove entire branches or stems back to the main trunk. This opens up the plant’s interior and removes weak growth.
Deadheading removes spent flowers before they set seed. This encourages many plants to produce more blooms.
Best Tools for Pruning
Sharp, clean tools make better cuts that heal faster. Dull tools crush stems and create ragged wounds.
Small pruning shears work well for stems up to pencil thickness. They provide clean cuts with minimal effort.
Scissors can handle delicate pruning on small plants or thin stems. Keep a dedicated pair for plant use only.
For thicker stems, proper pruning shears with bypassing blades make clean cuts without crushing.
Clean tools between plants with rubbing alcohol. This prevents spreading diseases from infected plants to healthy ones.
How to Prune Different Plant Types
Different plants need different pruning approaches. Understanding plant growth patterns helps you prune effectively.
Vining Plants (Pothos, Philodendrons)
Prune vining plants anywhere along the stem. Cut just above a leaf node where you want new growth to emerge.
Remove leggy, leafless sections by cutting back to where healthy leaves remain. This redirects energy to fuller growth.
Prune to maintain desired length and shape. These plants tolerate aggressive pruning and bounce back quickly.
Save healthy cuttings for propagation. Most vining plants root easily in water or soil.
My pothos looked sparse and leggy until I learned to prune it regularly. Now it’s full and bushy from all the branching the cuts stimulated.
Bushy Plants (Ferns, Begonias)
Remove entire dead or dying fronds or stems at the base. Don’t leave stubs that can rot.
Thin out the center if growth becomes too dense. This improves air circulation and light penetration.
Pinch growing tips to encourage branching and fuller growth habit.
Remove any brown or damaged leaf tips by cutting just into healthy tissue. Make angled cuts for a more natural appearance.
Upright Plants (Dracaenas, Snake Plants)
Remove entire damaged or yellowing leaves at the base. Cut as close to the soil line as possible.
For dracaenas and similar plants, you can cut stems at any height. New growth emerges from just below the cut.
Snake plants rarely need pruning except to remove damaged leaves. Cut damaged leaves at soil level.
Avoid pruning actively growing tips unless trying to control height. Let healthy growth continue naturally.
Flowering Plants (African Violets, Begonias)
Deadhead spent flowers by pinching or cutting below the flower stem. This encourages more blooms.
Remove lower, older leaves that turn yellow or crowd the center. This improves appearance and reduces disease risk.
Pinch back leggy growth to encourage compact, bushy form.
For African violets, remove leaves from the lowest ring periodically. This keeps plants neat and directs energy to newer growth.
Succulents and Cacti
Prune damaged or diseased portions back to healthy tissue. Let cuts dry for several days before exposing to moisture.
Remove etiolated (stretched) growth completely. Succulents won’t produce new leaves on stretched stems.
For branching succulents, remove individual rosettes at their base for propagation or to thin crowded plants.
Use clean, sharp tools as succulent cuts can easily become infected. Consider dusting cuts with cinnamon as a natural fungicide.
Common Repotting Mistakes to Avoid
These frequent errors cause problems that proper technique prevents. Learning what not to do is as important as learning correct methods.
Choosing Pots That Are Too Large
Jumping to much larger pots seems efficient but creates problems. Excess soil stays wet for too long, promoting root rot.
Roots grow to fill their space. In oversized pots, plants focus on root growth rather than above-ground growth.
Go up gradually in size. The 1-2 inch rule prevents most overwatering issues associated with too-large containers.
Using the Wrong Soil Type
Not all potting mixes suit all plants. Succulents in standard potting soil stay too wet and rot.
Orchids need specialized bark-based media, not regular potting soil. Standard mix suffocates their roots.
Match soil type to plant needs. Using appropriate mix prevents most root problems.
Burying Stems Too Deep
Planting deeper than the original depth can rot stems and crowns. Soil moisture against stems encourages fungal problems.
The soil line should match where it was before repotting. Don’t cover any stems that were previously exposed.
For plants that develop aerial roots (like monsteras), those roots can be buried but the main stem should stay at the same depth.
Packing Soil Too Firmly
Pressing soil down hard eliminates air pockets roots need. Compacted soil drains poorly and suffocates roots.
Add soil loosely and tap the pot to settle it naturally. Don’t push down with your hands.
Use a chopstick to gently work soil between roots, but don’t compress it.
Repotting at the Wrong Time
Repotting during dormancy stresses plants unnecessarily. They can’t actively grow new roots to establish in fresh soil.
Wait for spring when active growth begins. Plants recover much faster during their natural growing season.
Emergency repotting (like for root rot) is an exception. Sometimes you must repot regardless of season to save a plant.
Common Pruning Mistakes to Avoid
Improper pruning can damage plants or create unattractive growth patterns. These mistakes are easily preventable.
Cutting in the Wrong Places
Cutting between nodes leaves a stub that dies back and looks unsightly. Always cut just above a node where new growth can emerge.
Random cuts without considering growth patterns create odd shapes. Think about where you want new growth before cutting.
For branching plants, cut just above outward-facing nodes. This encourages growth to spread out rather than inward.
Using Dull or Dirty Tools
Dull blades crush stems instead of cutting cleanly. The damaged tissue takes longer to heal and can invite disease.
Dirty tools spread diseases between plants. One infected plant can contaminate your entire collection through shared tools.
Sharpen and clean tools regularly. This small effort prevents major problems.
Removing Too Much at Once
Taking more than 25-30% of a plant at one time causes severe stress. The plant may struggle to recover from such aggressive pruning.
Prune gradually over several sessions if major reshaping is needed. This lets the plant adjust between cuts.
Less is more when you’re uncertain. You can always prune more later, but you can’t reattach what you’ve removed.
Pruning at the Wrong Time
Pruning during active growth encourages new shoots. Pruning during dormancy reduces stress but won’t stimulate new growth until spring.
For flowering plants, prune after blooming finishes. Pruning before flowering removes the buds you’re waiting for.
Spring is ideal for most pruning since plants quickly replace removed growth.
Ignoring Plant-Specific Needs
Some plants bloom on new growth while others bloom on old wood. Knowing the difference prevents accidentally removing next season’s flowers.
Research your specific plant’s growth pattern before major pruning. This ensures you’re enhancing rather than hindering its natural form.
Seasonal Maintenance Schedule
Planning repotting and pruning around seasons ensures plants get care when they’ll benefit most.
Spring: Prime Time for Major Work
Spring is ideal for repotting root-bound plants. Active growth means quick establishment in new pots.
Prune for shape and size control in early spring. New growth fills in quickly during the growing season.
Check all plants for signs they need repotting. Look for roots emerging from drainage holes or extremely fast soil drying.
Increase watering and fertilizing as new growth appears after repotting or pruning.
Summer: Maintenance Pruning
Remove dead or damaged leaves as they appear. Don’t let them accumulate and attract pests.
Pinch growing tips to encourage bushier growth. This quick maintenance keeps plants fuller.
Deadhead flowering plants to encourage continued blooming.
Avoid major repotting in hottest months. The stress of repotting plus heat stress can overwhelm plants.
Fall: Preparation for Dormancy
Complete any necessary repotting before fall. Plants need time to establish before winter dormancy.
Light pruning to remove dead material is fine. Avoid heavy pruning that stimulates new growth heading into winter.
Reduce watering as growth slows. Plants in fresh, roomier soil need less frequent watering than during active growth.
Winter: Minimal Intervention
Avoid repotting during winter dormancy unless absolutely necessary for plant health.
Prune only dead or diseased material. Don’t stimulate new growth during low-light winter months.
Many plants rest during winter. Respect this dormancy by minimizing disturbance.
Plan spring repotting needs so supplies are ready when growing season begins.
Troubleshooting After Repotting or Pruning
Even with perfect technique, plants sometimes show stress. Knowing what’s normal versus concerning helps you respond appropriately.
Normal Post-Repotting Responses
Slight wilting for a day or two is normal. Disturbed roots need time to resume normal water uptake.
A few yellowing older leaves may occur. The plant sheds some foliage while adjusting to its new environment.
Slower growth for 2-3 weeks is expected. The plant focuses energy on root establishment before resuming top growth.
These temporary issues resolve on their own with proper care and patience.
Warning Signs After Repotting
Severe wilting that doesn’t improve suggests root damage or improper watering. Check soil moisture and adjust accordingly.
Widespread yellowing or leaf drop indicates serious stress. Review repotting process for possible errors like damaged roots or wrong soil type.
No new growth after 4-6 weeks may mean the plant is struggling. Check for root rot, pests, or other issues.
Normal Post-Pruning Responses
Slight slowing of growth while the plant redirects energy is normal. New shoots should appear within weeks.
Some leaves dropping near pruning cuts can occur. The plant is adjusting its leaf distribution after losing some growth.
Vigorous new growth from below pruning cuts shows your technique worked. This is exactly what pruning aims to achieve.
Warning Signs After Pruning
Widespread dieback beyond pruned areas suggests problems. Check for disease or pest issues that might have been hiding.
No new growth where expected indicates incorrect cutting location. You may have cut between nodes rather than just above them.
Infection at cut sites shows tools weren’t clean or cuts weren’t clean. Treat with appropriate fungicide if needed.
Building Confidence with Practice
Both repotting and pruning become easier with experience. Start with forgiving plants and work up to more challenging specimens.
Best Plants for Practicing
Pothos tolerates almost any repotting or pruning mistake. It bounces back quickly and shows you what successful recovery looks like.
Spider plants are nearly indestructible. Practice repotting techniques without worrying about killing them.
Succulents show clear signs of stress or success. Their response time teaches you to read plant signals.
Keeping Records
Note repotting dates for each plant. This helps you recognize patterns in how often different species need repotting.
Take photos before and after pruning. Visual records show which techniques work best for different growth habits.
Track recovery times after repotting or pruning. Understanding normal timelines prevents unnecessary worry.
Learning from Mistakes
Every plant parent makes mistakes. I’ve certainly killed my share of plants through poor repotting or aggressive pruning.
Each mistake teaches valuable lessons. My plants now thrive because I learned what doesn’t work.
Start with less precious plants for practice. Save your rare specimens until you’ve built confidence on common varieties.
Conclusion
Repotting and pruning are essential skills that transform your plant care from basic watering to true maintenance. These techniques keep plants healthy, attractive, and thriving for years.
Start with one technique at a time. Master repotting before worrying about complex pruning, or vice versa based on your plants’ needs.
Remember that plants are remarkably resilient. They’ve evolved to survive far worse than our well-intentioned mistakes. Trust the process and learn as you go.
The transformation in my plant collection after learning proper repotting and pruning techniques was remarkable. Plants that had stagnated suddenly thrived. Growth exploded once roots had room and energy went to the right places.
Your plants will tell you when they need these interventions. Learn to read their signals, gather proper supplies, and act confidently. The results will speak for themselves in healthier, more beautiful plants.
Take on your first repotting or pruning project this week. Choose one plant that clearly needs attention and apply what you’ve learned here. You’ll be amazed at how straightforward the process becomes once you actually do it.
Happy Planting,
Jasmine


One Comment