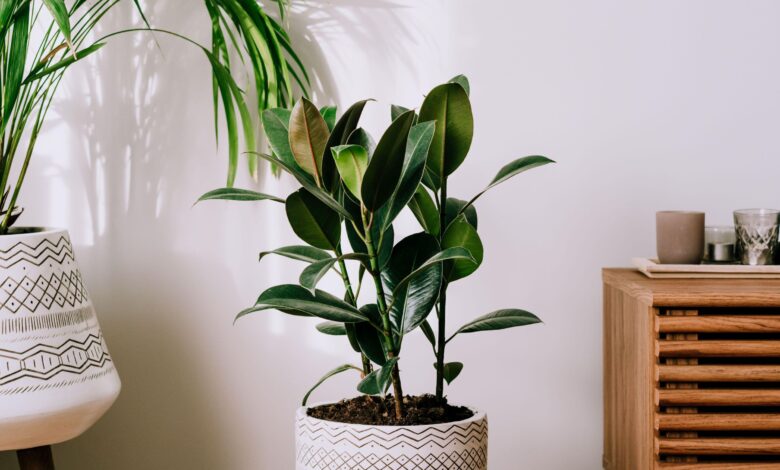
So you want to talk about rubber plants? Let’s get down to business! The Ficus elastica, or rubber plant as we lovingly call it, has been making a serious comeback in the houseplant world. And honestly? It deserves every bit of that hype.
These glossy-leaved beauties are practically begging to become the statement piece in your living room. Whether you’re a seasoned plant parent or someone who’s killed more succulents than you’d like to admit, the rubber plant is about to become your new best friend.
What is a Rubber Plant Anyway?
Rubber plants are tropical evergreens native to Southeast Asia, particularly India and Malaysia. In their natural habitat, these guys can grow into massive trees reaching up to 100 feet tall. Don’t worry though – your indoor rubber plant will max out around 6 to 10 feet, and that’s if you’re really giving it the royal treatment.

The name “rubber plant” comes from the milky latex sap that flows through the plant. Back in the day, this sap was actually used to make rubber before synthetic alternatives took over. Pretty cool, right?
What makes Ficus elastica such a winner in the houseplant game is that gorgeous, thick, waxy foliage. The leaves are large, oval-shaped, and come in varieties ranging from deep burgundy to variegated cream and green patterns. They’re basically the supermodels of the plant world – tall, glossy, and effortlessly stunning.
Types of Rubber Plants You’ll Want to Know About
The rubber plant family is more diverse than you might think. Here are the popular varieties you’ll find at your local nursery:
Ficus Elastica ‘Burgundy’ – This is the drama queen of rubber plants. Deep, almost black-red leaves that look absolutely stunning against light-colored walls. This variety loves bright light to maintain that rich coloring.
Ficus Elastica ‘Tineke’ – The variegated beauty with cream, green, and pink-toned leaves. A bit more high-maintenance than the standard green variety, but totally worth it for those Instagram-worthy looks.
Ficus Elastica ‘Ruby’ – Similar to Tineke but with more pronounced pink and red variegation. These guys are simps for bright indirect light – the more light, the more vibrant those colors become.
Ficus Elastica ‘Robusta’ – The classic green rubber plant. This is your starter rubber plant, super forgiving and adaptable. If you’re new to Ficus elastica care, start here.
Ficus Elastica ‘Shivereana’ – The quirky cousin with mottled, paint-splatter-like variegation. Harder to find but absolutely stunning when you can get your hands on one.
Light Requirements: Finding That Sweet Spot
Let me be real with you – lighting is where most people mess up their rubber plant care. These plants are pretty flexible, but they definitely have preferences.
Rubber plants thrive in bright, indirect light. Think of a spot near an east or west-facing window where the plant gets plenty of filtered sunlight throughout the day. A few hours of direct morning sun? They can handle it. But that intense afternoon sun will scorch those beautiful leaves faster than you can say “photosynthesis.”
I’ve seen rubber plants survive in lower light conditions, but here’s the thing – they’ll survive, not thrive. In low light, your Ficus elastica will grow slowly, get leggy, and those lower leaves might start dropping. The variegated varieties are especially picky about light. Without enough brightness, they’ll lose that gorgeous coloring and revert to plain green.
My ideal setup? Place your rubber plant about 3 to 5 feet from a bright window with sheer curtains. This gives them that goldilocks zone of light – not too much, not too little, just right.
One pro tip: Rotate your rubber plant every few weeks. These guys are phototropic, meaning they’ll lean toward the light source. Rotating ensures even growth and prevents that awkward one-sided look.
Watering Your Rubber Plant: The Moisture Balance
Here’s where rubber plant care gets interesting. Unlike peace lilies that are literally simps for water, rubber plants prefer a more balanced approach. They like their soil to dry out somewhat between waterings.
During the growing season (spring and summer), I water my rubber plant when the top 1 to 2 inches of soil feels dry to the touch. Stick your finger in the soil – if it feels moist, wait a few more days. If it’s dry, it’s watering time.
When you do water, do it thoroughly. I bring my pot over to the sink and water until it drains out the bottom. This ensures the entire root system gets hydrated and helps flush out any salt buildup from fertilizers. Let it drain completely before putting it back – rubber plants hate sitting in water.
In fall and winter, cut back on watering significantly. The plant’s growth slows down, so it needs less moisture. I usually water mine once every 10 to 14 days during winter months, but this depends on your home’s humidity and temperature.
The biggest mistake? Overwatering. Root rot is a rubber plant’s worst enemy. If you see yellowing leaves, mushy stems, or a funky smell coming from the soil, you’ve probably been too generous with the H2O.
Underwatering is less common but still possible. Drooping leaves, dry leaf edges, and leaves falling off are signs your rubber plant is thirsty. The good news is that these plants are pretty expressive – they’ll tell you when something’s wrong.
Soil and Potting: Setting Up for Success
Rubber plants aren’t super picky about soil, but they definitely perform better in the right mix. The key word here is drainage. These tropical beauties need soil that holds some moisture but doesn’t stay soggy.
I use a well-draining potting mix made of:
- 60% quality potting soil
- 20% perlite or pumice
- 20% orchid bark or coco coir
This mixture gives the roots access to moisture while ensuring excess water drains away quickly. You can also use a standard houseplant potting mix and add extra perlite – basically just beef up the drainage factor.
When it comes to pots, drainage holes are non-negotiable. I don’t care how cute that ceramic planter without drainage is – don’t do it. Your rubber plant’s roots need somewhere for that excess water to escape.
Size matters too. Choose a pot that’s 1 to 2 inches larger in diameter than the current root ball when repotting. Going too big too fast can lead to overwatering issues because there’s too much soil holding moisture around limited roots.
Repot your rubber plant every 1 to 2 years in the spring. You’ll know it’s time when roots start poking out of drainage holes or when growth noticeably slows down. This gives the plant fresh soil and more room to spread out those roots.
Temperature and Humidity: Creating That Tropical Vibe
Remember, rubber plants are tropical natives, so they like it warm and humid. But here’s the good news – average home conditions work perfectly fine for these adaptable plants.
Temperature: Rubber plants are happy between 60°F to 75°F (15°C to 24°C). They can tolerate slightly warmer temps, but anything below 50°F (10°C) and you’re asking for trouble. Keep them away from cold drafts, air conditioning vents, and definitely away from that window that gets freezing in winter.
I learned this the hard way when I left my rubber plant too close to a drafty window one winter. The leaves started dropping like it was going out of style. Moved it to a warmer spot, and problem solved.
Humidity: While rubber plants can survive in average household humidity (around 40-50%), they absolutely love higher humidity levels of 50-60%. In their native habitat, these guys are used to humid, rainforest conditions.
Here’s how to boost humidity for your Ficus elastica:
- Group plants together to create a humid microclimate
- Use a humidifier nearby (this is my preferred method)
- Place the pot on a pebble tray filled with water
- Mist the leaves occasionally, though this is more for cleaning than humidity
Brown leaf edges and crispy leaf tips are telltale signs your rubber plant wants more humidity. In winter when indoor heating dries out the air, pay extra attention to humidity levels.
Fertilizing: Feeding Your Rubber Plant
Rubber plants aren’t heavy feeders, but they do appreciate regular fertilization during the growing season. This is what keeps those leaves glossy and promotes healthy new growth.
I fertilize my rubber plant every 4 weeks during spring and summer using a balanced liquid fertilizer diluted to half strength. Something like a 10-10-10 or 20-20-20 NPK ratio works great. The dilution is important – full-strength fertilizer can burn the roots and cause more harm than good.
During fall and winter, I cut back to fertilizing once every 6 to 8 weeks, or sometimes not at all. The plant’s metabolism slows down in cooler months, so it doesn’t need as much nutrition.
Signs you might be over-fertilizing include:
- White crusty buildup on soil surface (salt accumulation)
- Brown leaf tips
- Yellowing leaves despite proper watering
If you see these signs, flush the soil thoroughly with water to wash away excess salts, and ease up on the fertilizer schedule.
Organic options work too! You can use compost tea, worm castings, or fish emulsion if you prefer the natural route. Just remember – less is more when it comes to feeding your rubber plant.
Pruning and Shaping: Keeping Things Tidy
One of the coolest things about rubber plant care is that you have control over the plant’s shape and size. These plants respond really well to pruning, and honestly, it’s one of my favorite plant care activities.
Why prune? To control height, encourage bushier growth, remove damaged leaves, or just maintain the shape you want. Rubber plants naturally grow tall and sometimes leggy, especially in lower light conditions.
When to prune? Spring or early summer is the ideal time. This is when the plant is actively growing and will recover quickly from pruning stress.
How to prune? Use clean, sharp pruning shears or scissors. Make cuts just above a leaf node at a 45-degree angle. This is where new growth will emerge from.
Here’s the thing about that milky latex sap – it’s gonna ooze out when you make cuts. It’s not harmful to the plant, but it can be messy and irritating to skin. I wear gloves and keep paper towels handy to dab away the sap.
Want a bushier rubber plant instead of a tall tree? Cut the main stem where you want branching to occur. This forces the plant to grow lateral branches from nodes below the cut. I did this to my leggy rubber plant last spring and now it’s beautifully full and bushy.
Don’t throw away those cuttings! You can propagate them to make more rubber plants. More on that in a sec.
Propagating Rubber Plants: Making Baby Plants
The rubber plant is very easy to propagate, which means free plants for you or gifts for your plant-loving friends. There are a few methods that work well.
Stem Cuttings in Water: This is my go-to method because I love watching roots develop. Take a cutting with 2 to 3 leaves, remove the bottom leaf, and place the cutting in a jar of water. Change the water weekly and roots should develop in 2 to 4 weeks. Once roots are a few inches long, pot up in soil.
Stem Cuttings in Soil: Take a 4 to 6 inch cutting, let the latex sap dry for a few hours, dip the cut end in rooting hormone (optional but helpful), and plant directly in moist potting mix. Keep the soil consistently moist and provide bright indirect light. Roots develop in 4 to 6 weeks.
Air Layering: This is a more advanced technique but super effective for rubber plants. Make a small wound in the stem, wrap it with moist sphagnum moss and plastic wrap, and wait for roots to develop. Once you see significant root growth through the moss, cut below the rooted section and pot it up.
The best time to propagate is during spring or early summer when the plant is actively growing. Temperature matters too – keep your cuttings in a warm spot (around 70-75°F) for faster root development.
Pro tip: Variegated rubber plants can be slower to root and may revert to solid green if the cutting doesn’t have enough chlorophyll. Choose cuttings with a good amount of green for better success rates.
Common Problems and How to Fix Them
Even with great rubber plant care, issues can pop up. Here’s how to troubleshoot like a pro:
Yellow Leaves: Usually overwatering, but can also be underwatering, low light, or nutrient deficiency. Check your watering routine first. If the soil is constantly soggy, let it dry out more between waterings. If it’s bone dry, water more frequently.
Brown Leaf Edges: Low humidity or inconsistent watering. Boost the humidity and establish a more regular watering schedule. These crispy edges won’t turn green again, but you can trim them off for aesthetics.
Leaves Dropping: This one stresses people out, but it’s often normal! Rubber plants naturally shed older lower leaves as they grow. However, rapid leaf drop can indicate cold drafts, overwatering, or sudden environmental changes.
Leggy Growth: Not enough light. Move your plant closer to a window or add a grow light. You can also prune back leggy stems to encourage bushier growth.
No New Growth: Could be pot-bound roots, lack of fertilizer, insufficient light, or just dormancy during winter months. Check if roots are circling the pot and repot if needed. Fertilize during growing season and ensure adequate light.
Faded Variegation: Variegated varieties need more light to maintain their coloring. Move to a brighter location and watch those colors come back.
Pests and Diseases: Keeping Your Plant Healthy
Rubber plants are pretty resilient, but they can still fall victim to common houseplant pests and diseases.
Spider Mites: These tiny pests love dry conditions. You’ll notice fine webbing and stippled leaves. Increase humidity, spray down the plant with water, and use insecticidal soap or neem oil. I inspect my rubber plant leaves regularly – catching these guys early makes treatment way easier.
Mealybugs: White, cottony pests that hide in leaf crevices and along stems. Remove with a cotton swab dipped in rubbing alcohol, then spray with neem oil.
Scale Insects: Small, brown, shell-like bumps on stems and leaves. Scrape off with your fingernail or a soft brush, then treat with neem oil or insecticidal soap.
Root Rot: This is a disease caused by overwatering and poor drainage. Signs include yellowing leaves, mushy stems, and a foul odor from soil. If caught early, you can save the plant by removing it from soil, cutting away rotted roots, and repotting in fresh, dry soil. Prevention is key though – proper watering and drainage are your best defense.
Keeping leaves clean helps prevent pest issues. I wipe down my rubber plant’s leaves every few weeks with a damp cloth. This removes dust, helps the plant photosynthesize better, and lets me spot any pest problems early.
Cleaning and Maintenance: Keep That Shine
Those big, glossy leaves are part of the rubber plant’s appeal, but they’re also dust magnets. Regular cleaning is part of good rubber plant care and honestly, it’s pretty satisfying.
Every few weeks, I give my rubber plant’s leaves a gentle wipe-down with a damp, soft cloth. This removes dust and keeps the leaves looking shiny and healthy. Some people use leaf shine products, but I prefer just water – natural is best, and those shine products can clog leaf pores over time.
For a deeper clean, you can give your rubber plant a shower! Literally bring it to the bathroom and rinse it down with lukewarm water. This washes away dust, pests, and any residue. Just make sure to let it drain completely before returning it to its spot.
Rubber Plant Care: Quick Reference Guide
Let me break down the essential rubber plant care requirements in one easy-to-reference spot:
Light: Bright, indirect light. A few hours of direct morning sun is okay. 4-6 hours of filtered light is ideal. Variegated varieties need more light than solid green types.
Water: Water when top 1-2 inches of soil feels dry. Thoroughly water until it drains from the bottom. Reduce watering in winter. Never let the plant sit in standing water.
Soil: Well-draining potting mix with added perlite and bark. Soil should retain some moisture but drain excess quickly.
Temperature: 60-75°F (15-24°C). Keep away from cold drafts and heating/cooling vents. Minimum temperature tolerance is around 50°F (10°C).
Humidity: 40-60% humidity. Average home humidity is acceptable, but higher is better. Use humidifiers or pebble trays in dry environments.
Fertilizer: Balanced liquid fertilizer diluted to half strength every 4 weeks during spring and summer. Reduce or stop fertilizing in fall and winter.
Pruning: Prune in spring/summer to control size and encourage bushier growth. Wear gloves due to latex sap.
Repotting: Every 1-2 years in spring. Use a pot 1-2 inches larger than the current one. Always use pots with drainage holes.
Propagation: Stem cuttings in water or soil. Best success in spring/summer. Air layering works great for larger plants.
Toxicity: Toxic to cats, dogs, and humans if ingested. The latex sap can cause skin irritation. Keep out of reach of pets and children.
Why Your Home Needs a Rubber Plant
Beyond being gorgeous statement plants, rubber plants actually improve your indoor environment. Studies have shown that Ficus elastica is effective at removing air pollutants like formaldehyde from indoor air. They’re basically natural air purifiers that also happen to look amazing.
The rubber plant’s large leaves also help humidify the air through transpiration. This is especially beneficial during dry winter months when indoor heating sucks all the moisture out of the air.
From a design perspective, rubber plants are incredibly versatile. The classic green Robusta fits into minimalist, modern spaces. Variegated varieties like Tineke or Ruby add a pop of color to neutral rooms. The burgundy variety creates dramatic contrast against light walls.
These plants work as floor plants in corners, statement pieces next to furniture, or even as part of a plant shelf setup when they’re younger. As they grow, they develop into tree-like specimens that can really anchor a room’s aesthetic.
Final Thoughts: Rubber Plant Care Made Simple
Look, rubber plant care doesn’t have to be complicated. These plants are forgiving, adaptable, and honestly pretty hard to kill if you follow the basics. Give them bright indirect light, water when the soil dries out a bit, maintain decent humidity, and they’ll thrive.
The key is consistency and observation. Your rubber plant will tell you what it needs – drooping leaves mean it’s thirsty, yellow leaves might mean you’re overwatering, leggy growth means more light. Pay attention to these signals and adjust your care accordingly.
Start with a classic green Ficus elastica if you’re new to these plants. Once you’ve mastered the basics, branch out to those stunning variegated varieties. Before you know it, you’ll have a collection and you’ll be the one giving rubber plant care advice to your friends.
Whether you’re a seasoned plant parent or just starting your indoor jungle, the rubber plant deserves a spot in your home. Easy care, air-purifying benefits, and those gorgeous glossy leaves – what’s not to love?
Now get out there and find yourself a rubber plant. Your home will thank you, your air will be cleaner, and you’ll have a stunning green companion that’ll stick around for years to come.
Happy planting!