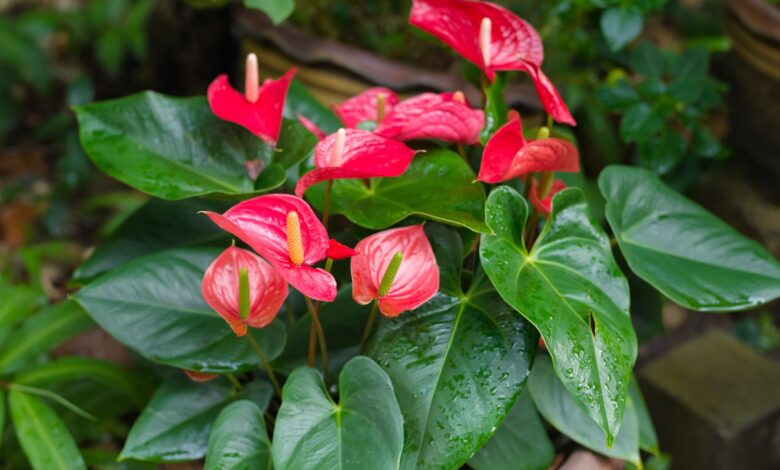
So you want to talk about Anthuriums? Let’s get down to business! These glossy-leaved beauties with their heart-shaped “flowers” (spoiler: those aren’t actually flowers) are basically the supermodels of the houseplant world. Elegant, eye-catching, and just a little bit high-maintenance – but totally worth it.
Anthuriums bring that tropical resort vibe into your home with those waxy, colorful spathes in red, pink, white, or even purple. And unlike most flowering houseplants that bloom once and call it a day, Anthuriums can produce those stunning blooms year-round with proper care. Yeah, you read that right – YEAR-ROUND flowering is possible with these beauties.
What Are Anthurium Plants?
Anthuriums are tropical flowering plants native to Central and South America, particularly Colombia and Ecuador. They grow as epiphytes in the wild – meaning they attach to trees and absorb moisture and nutrients from the air and rain, not from soil. This epiphytic nature is crucial to understanding their care needs.

The genus Anthurium includes over 1,000 species, but the ones commonly grown as houseplants fall into two main categories:
Anthurium Andraeanum (Flamingo Flower) – These are the classic Anthuriums with those glossy, heart-shaped spathes. The spathe is actually a modified leaf, not a flower. The real flowers are the tiny bumps on that spike (called a spadix) protruding from the spathe. Red is most common, but you’ll find pink, white, coral, purple, and even bi-color varieties.
Anthurium Scherzerianum (Pigtail Anthurium) – Similar to Andraeanum but with a curly, spiraling spadix that looks like a pigtail. Slightly more compact growth and often considered a bit easier to care for.
Anthurium Clarinervium and other foliage types – Grown for their spectacular leaves rather than flowers. Dark green velvety leaves with prominent white or light green veining. Absolutely stunning but different care needs than flowering types.
For this guide, we’re focusing on flowering Anthuriums (Andraeanum and Scherzerianum) – the ones people buy for those gorgeous colorful spathes.
Here’s what makes Anthuriums special: those “flowers” last for MONTHS. A single spathe can stay vibrant and fresh for 6 to 8 weeks or even longer. And with proper care, the plant continuously produces new spathes throughout the year. It’s like having fresh flowers permanently without the weekly flower shop trips.
Light Requirements: Bright but Filtered
Lighting is absolutely critical for Anthurium care and flowering. Get this wrong and you’ll have a plant that survives but never blooms. And let’s be real – you’re growing Anthuriums for those flowers, not just the foliage.
Anthuriums need bright, indirect light. Think of their natural habitat – growing on trees under a rainforest canopy where light is filtered through leaves. They want brightness without harsh direct sun.
I keep my Anthuriums near an east-facing window where they get gentle morning sun and bright indirect light the rest of the day. This setup produces consistent blooming and healthy growth.
Optimal light conditions:
- Bright, filtered light for 6-8 hours daily
- A few hours of gentle morning sun is fine
- East-facing windows are perfect
- North-facing windows work if bright enough
- South or west windows need sheer curtains for filtering
In bright indirect light:
- Consistent flowering year-round
- Vibrant spathe colors
- Glossy, healthy leaves
- Compact, bushy growth
- Plant looking its absolute best
In too much direct sun:
- Scorched, brown patches on leaves
- Faded spathe colors
- Leaves turning yellow
- Plant looking stressed and unhappy
In insufficient light:
- Few or no flowers
- Leggy, stretched growth
- Dark green leaves but no blooms
- Long spaces between leaves
- Overall lackluster appearance
The most common reason Anthuriums don’t bloom is insufficient light. I see this constantly – people have healthy-looking plants with gorgeous foliage that never produce spathes. Move them to a brighter location and suddenly blooms appear.
I made this mistake with my first Anthurium. Had it in medium light for a year with zero flowers. Moved it closer to a window with brighter indirect light, and within 6 weeks, three new spathes emerged. Light is THAT important for flowering.
If you don’t have ideal natural light, grow lights work great for Anthuriums. Position a full-spectrum LED about 12-18 inches above the plant and run it for 10-12 hours daily. I have an Anthurium thriving under artificial light in my basement – it blooms just as well as my window plants.
Watering: Moist but Never Soggy
Anthurium watering is where things get a bit tricky. These plants like consistent moisture but are extremely susceptible to root rot. You need to find that goldilocks zone – moist enough to keep them happy but never waterlogged.
I water my Anthuriums when the top inch of soil feels dry to the touch. During growing season (spring and summer), this usually means watering every 5 to 7 days. In fall and winter, I stretch it to once every 7 to 10 days.
When I water, I do it thoroughly but carefully. I water until it drains from the bottom, let it drain completely, and empty any water sitting in the saucer immediately. Anthuriums sitting in water is basically a death sentence.
Signs of overwatering (this is serious with Anthuriums):
- Yellow leaves, especially older ones
- Brown or black spots on leaves that look mushy
- Wilting despite wet soil
- Root rot (black, mushy roots)
- Fungal growth on soil surface
- That gross swampy smell
Signs of underwatering:
- Leaves drooping or wilting
- Brown, crispy leaf edges
- Leaves feeling limp instead of firm
- Soil completely dry and pulling from pot sides
- Flowers wilting or dying prematurely
Here’s the thing about Anthurium roots – they’re thick, fleshy, and prone to rot. These plants evolved as epiphytes, so their roots are adapted to air exposure, not sitting in constantly wet soil. This is why drainage and proper watering are so crucial.
Water quality matters with Anthuriums. They’re sensitive to fluoride, chlorine, and salts in tap water, which causes brown leaf tips and edges. I use filtered water for all my Anthuriums, and the difference is dramatic.
If filtered water isn’t practical:
- Let tap water sit out for 24 hours (chlorine evaporates)
- Use distilled water
- Collect rainwater
- Flush soil occasionally to remove salt buildup
Bottom watering works really well for Anthuriums. Place the pot in a tray of water and let it soak up moisture from the drainage holes for 15-20 minutes. This ensures even moisture distribution without oversaturating the top layers of soil.
I check soil moisture by sticking my finger about an inch deep. If it feels dry, I water. If it’s still moist, I wait another day or two. A moisture meter can help if you’re not confident judging by feel.
Humidity: The Make or Break Factor
Let me be super clear about this – Anthuriums NEED high humidity. This is non-negotiable if you want healthy plants and consistent flowering. They’re tropical epiphytes from humid rainforests, and dry air makes them miserable.
Anthuriums prefer humidity levels of 60-80%. Most homes sit around 30-40% humidity, which is way too low. Low humidity causes:
- Brown, crispy leaf edges
- Browning spathe edges
- Flowers not developing properly
- Slow growth
- Increased susceptibility to pests (especially spider mites)
- Overall struggling, unhappy plant
I cannot stress this enough – if you can’t provide adequate humidity, reconsider getting an Anthurium. They’ll slowly decline in low humidity, and you’ll both be frustrated.
How to increase humidity for Anthuriums:
Humidifier – This is hands down the best solution and what I use. Run a cool-mist humidifier near your Anthuriums to maintain 60%+ humidity. Get a hygrometer to monitor levels – you’ll be shocked how dry your home actually is, especially in winter.
Grouping plants – Plants release moisture through transpiration. Grouping Anthuriums with other tropical plants creates a humid microclimate. I have my Anthuriums clustered with pothos, philodendrons, and ferns.
Pebble trays – Fill a tray with pebbles and water, place the pot on top (not sitting IN water). As water evaporates, it increases local humidity. This helps but isn’t enough on its own for most environments.
Bathroom placement – If you have a bright bathroom, it’s basically Anthurium paradise. Shower steam provides natural humidity. My pink Anthurium lives in my bathroom and blooms nonstop.
Terrarium or cabinet – For smaller Anthuriums, a glass cabinet or terrarium maintains high humidity naturally. Just ensure good air circulation to prevent fungal issues.
What doesn’t work well:
Misting – Provides only temporary humidity spikes lasting minutes. Plus, water sitting on leaves and flowers can cause fungal problems and brown spots. I occasionally mist for cleaning but never for humidity.
I invested in a good humidifier after my first Anthurium developed crispy brown leaf edges and stopped blooming. Once I got humidity up to 60%, new growth came in perfect and flowers started appearing regularly. It’s honestly the single most important factor for Anthurium success.
Temperature: Warm and Consistent
Anthuriums are tropical plants that need warmth year-round. They have zero cold tolerance and really don’t like temperature fluctuations.
Ideal temperature: 65-80°F (18-27°C). Anthuriums are happiest in this range, with flowering and growth both optimal.
Minimum temperature: Don’t let temps drop below 60°F (15°C). Below this, growth stops and the plant becomes stressed. Below 55°F (13°C), you’re risking damage.
Keep Anthuriums away from:
- Cold drafts from windows or doors
- Air conditioning vents blasting cold air
- Heating vents with hot, dry air (dry air is problematic)
- Cold exterior walls in winter
- Any temperature extremes or rapid changes
Consistent temperature is just as important as the actual temp. Anthuriums hate sudden changes – moving from a 75°F room to a 60°F hallway stresses them. Temperature stress shows up as drooping leaves, browning edges, or flower buds aborting.
I keep my home around 70-72°F year-round, which is perfect for Anthuriums. During winter, I make sure they’re not touching cold windows and move them slightly away from exterior walls.
If you want your Anthurium to bloom consistently, stable warmth is crucial. Flowering slows or stops if temperatures are too cool, even if everything else is perfect.
Soil and Potting: Airy and Well-Draining
Here’s where Anthurium care differs significantly from most houseplants. Remember, these are epiphytes – they grow on trees in nature, not in soil. Their roots need air as much as moisture. Dense, compacted soil suffocates them.
Standard potting soil is absolutely wrong for Anthuriums. It’s too dense, holds too much water, and leads to root rot. You need a very chunky, airy, well-draining mix.
My ideal Anthurium soil recipe:
- 40% orchid bark (provides chunkiness and aeration)
- 30% peat moss or coco coir (moisture retention)
- 20% perlite (drainage)
- 10% worm castings or compost (nutrients)
This mixture mimics their natural growing conditions – moisture available but tons of air pockets for roots to breathe. The chunky texture is key.
You can also use:
- Pre-made orchid mix with added peat/coco coir
- Pre-made aroid mix (sold for Anthuriums, philodendrons, Monsteras)
- Equal parts orchid bark, peat, and perlite
Whatever mix you use, it should be light, fluffy, and chunky. If you squeeze a handful, it should fall apart easily, not clump into a dense ball.
Pot selection is critical. Drainage holes are absolutely essential – no exceptions. Anthuriums will die in pots without drainage.
I prefer terracotta or unglazed ceramic pots for Anthuriums because they’re breathable and allow some air exchange. Plastic works too but retains more moisture. Whatever material you choose, drainage is the priority.
Size matters – Anthuriums actually prefer being slightly rootbound and bloom better in smaller pots. When repotting, only go up 1 inch in diameter. Oversized pots hold too much moisture and increase rot risk.
When to repot: Every 1 to 2 years in spring when roots are growing out of drainage holes or circling the pot. Anthuriums don’t like their roots disturbed, so only repot when necessary.
I repotted an Anthurium last spring that had become rootbound. Used a very chunky orchid-bark-heavy mix and went up just one pot size. Within weeks, new growth exploded and three new flower buds appeared. Good soil makes all the difference.
Fertilizing: Regular Feeding for Continuous Blooms
Anthuriums are moderate feeders. They need regular fertilization to support continuous flowering and healthy foliage growth. Those gorgeous spathes require energy and nutrients to produce.
I fertilize my Anthuriums every 2 weeks during spring and summer using a balanced liquid fertilizer diluted to quarter or half strength. Yeah, diluted – Anthuriums are sensitive to fertilizer salts, and full-strength formulas can burn roots.
I use a 20-20-20 NPK formula during active growth. Some people use bloom-boosting fertilizers higher in phosphorus (like 10-30-20) to encourage flowering, which works well too.
During fall and winter, I reduce fertilizing to once a month. Growth and flowering slow in shorter, darker days, so the plant needs less nutrition.
Fertilizing tips for Anthuriums:
- Always fertilize after watering, never on dry soil
- Dilute to quarter or half strength
- Flush soil with plain water every 6-8 weeks to remove salt buildup
- Organic options like diluted worm casting tea work great
- Consistency matters more than strength
Signs of over-fertilizing:
- Brown, crispy leaf tips and edges
- White crusty buildup on soil surface (salt accumulation)
- Stunted growth
- Root burn (brown, damaged roots)
Signs of under-fertilizing:
- Slow growth
- Small new leaves
- Reduced flowering
- Pale or yellowish leaves (if watering is correct)
- Overall lackluster appearance
If you see signs of over-fertilizing, flush the soil thoroughly by running water through it for several minutes to wash away excess salts. Then skip fertilizing for 4-6 weeks.
The key to great Anthurium flowering is consistent, light feeding. Regular small doses work better than occasional heavy feeding.
Getting Anthuriums to Bloom: The Secrets
Let’s talk about what everyone really wants – getting those spectacular spathes to appear regularly. Anthuriums CAN bloom year-round, but only with proper conditions.
Requirements for continuous blooming:
Bright indirect light – This is THE most critical factor. Without adequate light, flowering won’t happen regardless of other care. Anthuriums need 6-8 hours of bright, filtered light daily for consistent blooming.
High humidity – 60%+ humidity is essential for flower development. Dry air causes flower buds to abort or flowers to have brown edges.
Consistent warmth – Temperatures between 65-80°F promote flowering. Cooler temps slow or stop bloom production.
Regular fertilizing – Flowering requires energy. Feed every 2 weeks during growing season with balanced or bloom-boosting fertilizer.
Proper watering – Consistent moisture (not soggy) supports flowering. Water stress disrupts bloom production.
Mature plant – Young Anthuriums may not bloom until 1-2 years old. Be patient with newly purchased small plants.
Remove spent flowers – Cut off old spathes once they fade. This encourages the plant to produce new blooms instead of putting energy into seed production.
Here’s the flowering timeline: From when a flower spike first emerges to full spathe color takes about 4-6 weeks. The spathe then stays vibrant for 6-8 weeks or longer before fading to green. With proper care, your Anthurium should be producing new flower spikes regularly, creating continuous blooming.
I have a red Anthurium that consistently has 3-5 flowers at various stages – some emerging, some at peak color, some fading. It’s never without at least one or two gorgeous blooms. The key is bright light and consistent care.
Why your Anthurium isn’t blooming:
- Insufficient light (most common cause by far)
- Low humidity
- Too cool temperatures
- Inconsistent watering
- Lack of fertilization
- Plant too young
- Recently repotted (flowering pauses temporarily)
If your Anthurium has never bloomed or stopped blooming, move it to a brighter location and increase humidity. Nine times out of ten, this fixes the issue.
Pruning and Maintenance: Keeping Things Beautiful
Anthuriums need minimal pruning, but regular maintenance keeps them blooming prolifically and looking their best.
What to prune:
- Faded spathes (cut at the base once they turn green)
- Yellow or dead leaves (remove at the base)
- Damaged foliage
- Dead flower stalks after spathes fade
How to prune: Use clean, sharp scissors or pruning shears sterilized with rubbing alcohol. Cut as close to the base as possible without damaging the main plant.
Removing spent flowers is important – it signals the plant to produce new blooms instead of putting energy into seed production. Once a spathe fades to green and the spadix starts looking ratty, cut the entire flower stalk at the base.
I prune my Anthuriums every few weeks, removing any faded flowers or damaged leaves. It only takes a few minutes and makes a huge difference in appearance.
Leaf cleaning is crucial for Anthuriums. Those glossy leaves show dust easily, and dust blocks light. Every week or two, I gently wipe down leaves with a damp cloth or sponge.
This regular cleaning:
- Removes dust that reduces photosynthesis
- Keeps leaves glossy and vibrant
- Lets me inspect for pests early
- Shows off those beautiful heart-shaped leaves
Never use leaf shine products on Anthuriums. They can clog leaf pores and cause damage. Plain water on a soft cloth makes leaves shine naturally.
For a deeper clean, you can shower your Anthurium with lukewarm water. I do this monthly – bring it to the bathroom and gently rinse foliage. Let it drain completely before returning to its spot.
Propagating Anthuriums: Division Method
Anthuriums can’t be propagated from leaf or stem cuttings like many houseplants. The only reliable home propagation method is division.
When to divide: Spring is ideal, preferably when you’re already repotting. The plant is entering active growth and will recover quickly.
How to divide Anthuriums:
Step 1: Remove the plant from its pot. Shake off excess soil so you can see the root system and identify natural separation points.
Step 2: Look for where the plant naturally divides. Mature Anthuriums often have multiple crowns (growing points) with their own roots.
Step 3: Using clean hands or a sterile knife, gently separate the plant into sections. Each division should have at least one growing point and a good portion of roots attached. Larger divisions recover faster.
Step 4: Plant each division in its own pot with fresh Anthurium soil mix. Water thoroughly and place in bright, indirect light with high humidity.
Step 5: Keep humidity extra high and soil consistently moist (not soggy) for the first few weeks while roots establish. The divisions may look stressed initially – totally normal. Be patient.
I divided a large Anthurium that had gotten crowded with multiple growing points. Created two plants from one. They both sulked for about 3 weeks, then bounced back beautifully. Both are now blooming regularly.
Tips for successful division:
- Only divide healthy, established plants
- Larger divisions recover faster than small ones
- Divisions need extra TLC initially – high humidity, consistent moisture, protection from intense light
- Be patient – it can take 4-8 weeks for divisions to fully establish
- Flowering will pause temporarily but resumes once plant settles
Some growers also propagate Anthuriums from seeds, but this is time-consuming (takes 2-3 years to bloom) and requires pollination, which is impractical for most home growers.
Common Problems and Solutions
Even with great care, Anthuriums can have issues. Here’s how to troubleshoot:
Brown Leaf Tips and Edges
Super common complaint. Causes include:
- Low humidity (most common)
- Water quality (fluoride/chlorine)
- Over-fertilizing (salt buildup)
- Inconsistent watering
Solution: Increase humidity significantly, switch to filtered water, flush soil to remove salts, maintain consistent watering routine.
Yellow Leaves
Leaves turning yellow:
- Overwatering (most common – check if soil is soggy)
- Underwatering (less common)
- Natural aging of oldest leaves (normal if just one or two)
- Root rot (serious – check roots)
- Too much direct sun
Solution: Adjust watering routine, ensure proper drainage, check roots for rot, move if getting too much sun.
Brown Spots on Leaves or Spathes
Dark spots or patches:
- Fungal or bacterial infection (often from water on leaves)
- Cold damage
- Sunburn
- Physical damage
Solution: Remove affected leaves, improve air circulation, avoid getting foliage wet, ensure stable temperatures, move away from direct sun.
Flowers Not Developing or Aborting
Flower buds appear but die before opening:
- Low humidity (most common)
- Insufficient light
- Inconsistent watering
- Temperature stress
- Plant stress from repotting or environmental changes
Solution: Increase humidity dramatically, ensure bright indirect light, maintain consistent care, provide stable conditions.
No Flowers at All
Plant healthy but won’t bloom:
- Insufficient light (95% of cases)
- Low humidity
- Plant too young
- Lack of fertilization
- Too cool temperatures
Solution: Move to much brighter location, increase humidity, fertilize regularly, ensure warm temperatures, be patient with young plants.
Wilting Leaves
Leaves drooping despite proper watering:
- Root rot from overwatering
- Severe underwatering
- Root damage
- Fungal infection
- Temperature shock
Solution: Check roots for rot, adjust watering, ensure proper drainage, check for pests or disease.
Slow or No Growth
During growing season with no new leaves:
- Insufficient light
- Low humidity
- Lack of nutrients
- Rootbound (severely)
- Too cool temperatures
- Dormancy (normal in winter)
Solution: Increase light, boost humidity, fertilize regularly, repot if extremely rootbound, ensure warm temperatures.
Pests: Prevention and Treatment
Anthuriums can attract pests, especially when stressed or in low humidity. Regular inspection catches problems early.
Spider Mites
The worst pest for Anthuriums. Thrive in dry conditions. Signs include fine webbing, stippled leaves, and tiny moving dots.
Treatment: Immediately increase humidity (spider mites hate moisture), spray thoroughly with water to dislodge, treat with insecticidal soap or neem oil every 5-7 days for 3 weeks. Isolate infected plant.
I had spider mites on an Anthurium during dry winter. Required weeks of treatment plus dramatically increased humidity. Now I’m religious about maintaining 60%+ humidity to prevent recurrence.
Mealybugs
White cottony pests in leaf crevices and where leaves meet stems.
Treatment: Dab individual bugs with rubbing alcohol on cotton swab, spray with insecticidal soap or neem oil, repeat weekly for several weeks. Check regularly – these are persistent.
Scale Insects
Brown bumps on stems and undersides of leaves.
Treatment: Scrape off with fingernail or soft brush, spray with neem oil or insecticidal soap, check weekly because eggs can hatch.
Aphids
Small soft-bodied insects on new growth and flower buds.
Treatment: Rinse off with water spray, treat with insecticidal soap, check regularly for recurrence.
Thrips
Tiny insects causing silvery streaking and distorted new growth.
Treatment: Spray with spinosad or insecticidal soap, treat soil to kill pupating thrips, repeat weekly for a month.
Fungus Gnats
Small flying bugs around soil. Adults annoying but harmless – larvae damage roots.
Treatment: Let soil dry more between waterings, use yellow sticky traps for adults, drench soil with diluted hydrogen peroxide or BTI solution.
Prevention strategies:
- Maintain high humidity (prevents spider mites)
- Inspect weekly while cleaning leaves
- Quarantine new plants for 2 weeks
- Keep leaves clean
- Provide good air circulation
- Don’t overwater (prevents fungus gnats)
- Isolate infested plants immediately
Healthy Anthuriums with proper humidity and care are naturally more pest-resistant. Stress makes them vulnerable.
Anthurium Care: Quick Reference Guide
Light: Bright, indirect light for 6-8 hours daily. East-facing window ideal. No direct harsh sun. Critical for flowering.
Water: When top inch of soil is dry. Thoroughly water until it drains. Every 5-7 days in summer, 7-10 days in winter. Never let sit in water.
Soil: Very chunky, well-draining mix. Orchid bark, peat/coco coir, perlite. Must be airy – standard potting soil is wrong.
Temperature: 65-80°F (18-27°C) year-round. Minimum 60°F (15°C). No cold tolerance. Keep warm and stable.
Humidity: 60-80% essential. Use humidifier for best results. Low humidity causes brown edges and prevents flowering.
Fertilizer: Balanced liquid fertilizer at quarter to half strength every 2 weeks during spring/summer. Monthly in fall/winter.
Pruning: Remove faded spathes and dead leaves at base. Clean leaves weekly. Minimal pruning needed.
Repotting: Every 1-2 years in spring. Prefer being slightly rootbound. Use chunky aroid/orchid mix. Only go up 1 inch in pot size.
Propagation: Division only. Separate multiple crowns in spring. Each division needs growing point and roots.
Flowering: Requires bright light, high humidity, warmth, regular feeding. Spathes last 6-8 weeks. Can bloom year-round with proper care.
Toxicity: Toxic to pets and humans if ingested. Contains calcium oxalate crystals. Causes mouth/throat irritation. Keep away from pets and children.
Growth Rate: Moderate. Expect 3-6 new leaves and multiple flowers per year with optimal care.
Common Issues: Brown leaf tips (low humidity), no flowering (insufficient light), yellow leaves (overwatering), brown spots (fungal from wet leaves).
Final Thoughts: Anthurium Success
Anthuriums are absolutely worth the effort for anyone who loves flowering houseplants. Yeah, they need high humidity and specific conditions, but the payoff is spectacular – those waxy, vibrant spathes lasting months and appearing continuously throughout the year.
The keys to Anthurium success are bright indirect light and high humidity. Get these two factors right, and everything else falls into place. Skimp on either, and you’ll have a struggling plant that rarely blooms.
These aren’t beginner plants – they’re intermediate level requiring some investment (humidifier) and attention to detail. But they’re not as difficult as their reputation suggests either. Provide what they need consistently, and Anthuriums are actually quite rewarding.
I love that Anthuriums give you almost instant feedback. Happy plant? Glossy leaves and continuous blooms. Unhappy? Brown edges, no flowers, and a generally miserable appearance. They communicate clearly, which makes troubleshooting straightforward.
If you’re ready to level up from basic houseplants and want something spectacular that blooms year-round, Anthuriums are calling your name. Just make sure you can provide that humid, warm, bright environment they crave.
The first time you see a new flower spike emerge and watch it slowly develop into a full, vibrant spathe over several weeks – and then realize the spathe will stay perfect for months – you’ll understand why people love these plants despite their specific needs.
Now go invest in a humidifier, find a bright east-facing window, and bring home an Anthurium. Your space will instantly feel more tropical, and you’ll have gorgeous “flowers” brightening your home all year long.
Happy planting!


